Follow on Bloglovin

Total Pageviews

Tuesday, 7 January 2014

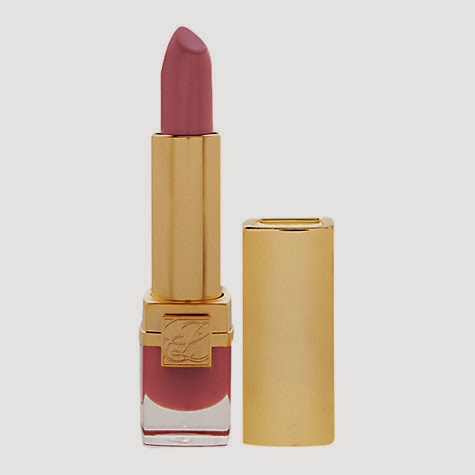
Estée Lauder Pink Parfait Long Lasting Lipstick

All beauty lovers like to be versatile in the products that they use when applying their make up, whether that be experimenting with new ones or just alternating old favourites. However, we all have those go to items that we use on a regular basis because they are just so fabulous.

For me, the Estée Lauder Pink Parfait Long Lasting Lipstick looks effortlessly beautiful with any look. I tend to apply this particular colour with a lip brush because it creates a stunning frosted pink, which can turn somewhat heavier if applied too generously so the brush just helps to blend it out a little bit. This strong coverage means that it would be suitable for anyone with pigmented lips!


Click HERE to view this product. (£20.00)


The shimmer incorporated within this gorgeous lipstick gives it a gloss feel and lasts for hours without drying out. I usually reapply it after about four hours just to keep my lips looking exceptionally full however the colour lasts for much longer than this.

Much like the product itself, the packaging is elegant and sophisticated making it the perfect handbag accessory.

Lots of love, Kenzie xxx

Monday, 6 January 2014

Suddenly Madame Glamour by Lidl

Coco Chanel once said, 'A woman who doesn't wear perfume has no future...' But trying to keep up with a powerhouse company like Chanel and their undeniably sweet smelling fragrances can get a little expensive at the best of times. (Especially if you are like myself and get extremely spritzer happy when applying your fragrances.)

Now, don't get me wrong, I think that it is absolutely acceptable to treat yourself from time to time and indulge in some pricier products but what about your everyday scent? Can we really justify spending a small fortune every month on a tiny bottle of perfume?

Chanel Coco Mademoiselle, comes in at £67 a bottle for 50ml. OUCH! However, global supermarket chain Lidl decided to compete with this prestigious brand by producing a rival fragrance called Suddenly Madame Glamour. A pretty brave move if you ask me, but one that definitely seems to be worth while.


Costing an absolutely amazing £3.99, this dupe smells almost identical to that of its competitor. It's at this point that I wish smellovision was real, but sadly that is just not the case. So instead, take my word for it lovely readers, its citrus and floral notes are immensely pleasant and undeniably worth its modest price.  

So if you like to keep reapplying your perfume throughout the day, then it may well be worth you popping down to your local Lidl store and purchasing this beautiful, feminine fragrance. And even if Suddenly Madame Glamour isn't the scent for you, then it's only cost you £3.99 right? The only down side? No Keira Knightley!

Let me know what you think of this lovely floral fragrance.

Lots of love, Kenzie xxx


Sunday, 5 January 2014

5 Easy Steps To Using An Eyelash Curler

Using an eyelash curler is, for many, a very daunting prospect. If you are finding yourself nodding and agreeing with me, then you are not dissimilar to myself a couple of months ago. But don't let this unfamiliar piece of equipment intimidate you, it truly can instantly enhance the shape of your eyes.

I naturally have a slight curl to my lashes, but I am still able to see the effects after using an eyelash curler! However, if you have straighter lashes then this will most definitely have a huge impact on you.


MAC Cosmetics Full Lash Curler (£16.00) is amazing, it is very gentle on the lashes but still achieves a beautiful, soft curl! Click HERE to view this product.


All you have to do is follow these five easy steps to achieve beautifully curled lashes.

1. It's important that you begin curling your lashes BEFORE you have applied any mascara. Many people do it differently and apply one coat and then use the curler, however I find that it can be more damaging to the lashes when using it with mascara as well as being more painful because the curler tends to stick to the lashes. 

2. Tilt your head upwards so that you are looking down into the mirror, this makes your lashes angular. This will make it much easier to curl them and will have a much greater outcome because if you are looking directly at a mirror your lashes are touching the crease of your eye, making it difficult to access them properly.

3. After making sure your curler is clean, place it onto your cheek and position it at the base of your lashes, making sure that you have gathered all of your eyelashes into the curler. (But be very careful not to pinch your lid!)

4. Once you are sure that you have positioned the curler correctly, squeeze down on the handle slowly until your eyelashes are between the two pads and hold it down. Pump the eyelash curler gently for ten seconds. 

5. Finish by applying your favourite mascara from the bases of your lashes right through to the tip! 

And there you have it, it really is a piece of cake! So next time you come across this funny looking device, go for it!

Lots of love, Kenzie xxx

Saturday, 4 January 2014

Barry M Matte Caramel Nails

So the saying 'start as you mean to go on' has been thrown around a lot the past couple of days, but how true is it?! 

For me the way you look after yourself can have a huge impact on the way that you feel! So why not take out a few more moments each day to pamper yourself. Whether it be to make sure your nails are in beautiful condition or just to have some 'you time.'

Today, I tried out some new Barry M nail varnishes! I used the matte caramel shade which gives a really lovely wintery feel and I added to this by involving a feature nail by using the glitter yellow topaz nail varnish. This glitter polish is new to the Barry M family and I love it. Its extremely easy to apply and unlike most glitter nail polish's, it only required two coats.


I chose the caramel colour because I often opt for bright colours in my outfits and find that sometimes my nails can clash with what I'm wearing! So this neutral varnish goes well with anything.

As you can see from the pictures below, I went for a very bright midi dress with gold accessories, so my neutral nails and the hint of gold on the feature nail matched perfectly! I did actually end up wearing different shoes to those that I am wearing in the pictures below, I wore leopard print platforms which were MUCH more uncomfortable but looked so much better with the dress!


(£3.99) Click HERE to view this product. 


(£2.99) Click HERE to view this product.


I 100% recommend you trying these amazing products, they are super cute!

Lots of love, Kenzie xxx

Friday, 3 January 2014

Contouring & Highlighting for Beginners. (Stage 2)

Following on from yesterday's blog, all about highlighting, today I'll be discussing contouring the face with bronzer and the use of blush. 

When contouring your cheeks it is important to make sure that you are doing so in the right area. If bronzer is applied in the wrong way, it can look very unnatural and completely opposite to the subtle shadow like impression that we are trying to make. 

To ensure that you are contouring the correct area, line your brush up with the top of your ear and the corner of your mouth, just underneath your cheekbone. This will give an extremely flattering finish.

Start by contouring your cheeks! Beginning at the top of your ear, apply the bronzer with a brush in circular motions in the direction of the corner of your mouth. However, do not take the bronzer any further than in line with the centre of your eye. Once again this will become unnatural and not so effortless!

Ensure that the bronzing powder has been worked into the hair line. You don't want any sudden make up lines to ruin your gorgeous make up! Simply achieve this by removing the excess from the brush and working it into the skin in circular motions.

When contouring your whole face, remember the three rule. You are aiming to apply bronzer from your hairline, into your cheekbones and finishing underneath your jawline. (In the shape of a three!) 

When doing this you only need a very small amount of product on the brush because if it is too dark they will no longer look like shadows being casted on the face.

Hoola by Benefit is fabulous because it is extremely natural and unlike most bronzers does not contain sparkles. Although this does like nice occasionally for a night out, when trying to achieve a natural look it is best to use a matte product. Click HERE to view this item. (£23.50)


To finish your perfectly defined face, add a small amount of blush to the apples of your cheeks.

I really hope that you have found both stages of my contouring blogs beneficial!

Lots of love, Kenzie xxx 

Thursday, 2 January 2014

Contouring & Highlighting for Beginners. (Stage 1)

Contouring the face can make a huge difference to your appearance. This method adds different dimensions to the face and can accentuate your best features. 

Contouring involves three main stages, highlighting, contouring and blush. However, in an attempt to keep the information overload to a minimum I thought I would blog about these stages separately.

This blog post is all about highlighting!

Highlighting can help to bring attention to a particular area on the face and can help to achieve more pronounced features, such as your cheekbones. You should aim to target areas that the light naturally hits. 

There are five main places that people tend to highlight on the face.
1. Below the eyes. This makes them 'pop' and works beautifully with a dramatic or smokey look. This can also help to eliminate dark circles underneath the eyes. If this is something that you particularly struggle with then I recommend using a salmon colour highlighter because that is particularly effective at cancelling out bags. 
2. Below the brow line and centre of the forehead.
3. Above the Cupid's bow. This accentuates the lips and enhances their shape. This effect can also be enhanced further by adding gloss to the centre of the lips to make them appear significantly fuller.
4. The highest point of your cheekbones.
5. The nose. This is a really useful method when trying to create the illusion of having a slimmer nose.

Highlighters come in both powder and liquid form. I tend to use both, depending on the look I am aiming to achieve. However, I would recommend using a liquid highlighter for a night out because they last for a longer period of time in comparison to the powder which seems to sink in to the skin more.

When applying the liquid, pat the product in to the skin rather than rubbing it in as this can remove the foundation from the skin.

The high beam highlighter by Benefit is amazing. (£19.50) Click HERE to view this product.


Contouring is also a hugely popular technique amongst celebs! Take Kim Kardashian for example, her beautifully sculpted face has been cleverly contoured to magnify her facial features. I have chosen this picture below because I think it demonstrates perfectly which areas of the face require highlighting.


Just remember, as with everything, practice makes perfect! So it may take you a couple of attempts to really get to grips with where on your face needs highlighting but keep at it and you'll get there!

Let me know how you get on with it! Lots of love, Kenzie xxx

Wednesday, 1 January 2014

KIKO Make Up Milano

To all of my lovely readers,

I'll begin by wishing you the happiest New Year, good luck in all that you do in 2014 and may all of your dreams come true.

To kick start January, I thought I'd share with you my latest make up discovery. 

Whilst shopping on holiday last month, I came across the most amazing make up shop called KIKO!


I had heard little things here and there about the store but had never actually ventured into one myself.

Their array of glamorous eyeshadows were what initially captured my attention but they also boast a huge selection of stunning nail polishes and an outstanding skincare range. Here's a little glimpse of what the store looks like!


As you can imagine, I certainly didn't come home empty handed, however I will post individual blogs about the items that I purchased to give a more detailed over view of the products.

So for now, I am simply urging you to check out their website and see if anything takes your fancy! It's also exceptionally appealing considering there is a sale of up to 50% off on selected products for a short time. So what are you waiting for? Click HERE to view KIKO's website.

Alternatively, if you are visiting the capital, pop into one of the three stores that KIKO have in London.

I hope you love their products as much as I do. Please feel free to comment and follow! 

Lots of love, Kenzie xxx