Follow on Bloglovin

Total Pageviews

Thursday 30 January 2014

Barry M Black Varnish NOTD

Long are the days that subtle nail designs were the norm. Today, with the extensive colour choices available to us we are able to experiment with various combinations and techniques to create unusual and unique styles.

For some time, black nail varnish has been a leading trend in the fashion industry and I've been excited to try this trend out for myself.

White and black is one of my favourite colour combinations!


I achieved this look by using a black Barry M varnish on all of my nails except the ring finger. The shade of this varnish is NP 47. As you can see from the picture above I decided to add a feature nail in white, this was also a Barry M polish in NP 66. I finalised this look by adding two jewels to my middle fingers.


Click HERE to view this product. (£2.99)

Click HERE to view this product. (£2.99)

This NOTD look goes amazingly with any outfit and is so chic right now!

Lots of love, Kenzie xxx


Wednesday 29 January 2014

Grammys 2014: Best Dressed

Talk about metallic madness! The stars were totally killing it at this years Grammy Awards, with the metallic look taking a spotlight on the red carpet.

Here are some of my fave looks sporting this unique design.


Taylor Swift's Champagne coloured Gucci gown was absolute perfection.


The 24 year old also hit it out of the park with her smokey eyed make up. A* from me!


Selena Gomez in a 'wow' metallic J. Mendel gown.


Ciara (and her perfectly rounded baby bump) looked stunning in this metallic bronze Emilio Pucci Gown.

Lots of love, Kenzie xxx


Friday 24 January 2014

Topshop January Sale OOTD

Its nearing that time when the Winter sales are coming to an end. *Cry* So I have put together a selection of gorgeous items, all from the Topshop sale, to make those January blues well and truly disappear. I love this outfit, its very basic but its this effortless simplicity that makes it so chic!

Knitted Bobble Jumper. Click HERE to view. Was £50.00 Now £25.00


Vintage Jamie High Waisted Skinny Jeans. Click HERE to view. Was £60.00 Now £35.00


POLLY Premium Chelsea Boots. Click HERE to view. Was £130.00 Now £40.00

If you'd prefer to add a pop of colour to this ensemble, then try replacing the bobble jumper for the following items to team with the jeans and boots shown above.

Strappy V-Neck Cami. Click HERE to view. Was £18.00 Now £10.00

Quilted Leather Look Biker Jacket. Click HERE to view. Was £58.00 Now £45.00


How could you possibly refuse a Topshop sale?!

Lots of love, Kenzie xxx

Sunday 19 January 2014

River Island New Arrivals 2014

With each new year, much to my excitement, comes new collections! In today's blog I will be showing you my best-loved items from River Island's latest arrivals. Here are just a few that I have picked out and added to the shopping basket...


Coral Geometric Print Pointed Court Shoes
Click HERE to view. (£50.00)


Pink Floral Print Smart Skort
Click HERE to view. (£30.00)


Orange Floral Print Sleeveless Maxi Dress (Limited Edition!)
Click HERE to view. (£35.00) 

Light Yellow Asymmetric Peplum Skirt
Click HERE to view. (£30.00)


Can you tell that I'm feeling colourful tonight?! I am absolutely loving River Islands new stock, it is definitely making me extremely excited for Summer!

What do you think of the bold floral patterns and bold colours?

Lots of love, Kenzie xxx

Tuesday 14 January 2014

Golden Globes 2014: Best Dressed

Every fashionista loves award season because as well as recognising Hollywoods finest, we are also desperate to see what our fave celebs are wearing!  

Here's my list of celebs who totally pulled it out of the bag at the Golden Globes this year.

Margo Robbie hit the nail on the head with this stunning look. The Australian actress had to be my best dressed, with her killer sleek bun and chic Gucci gown combo.


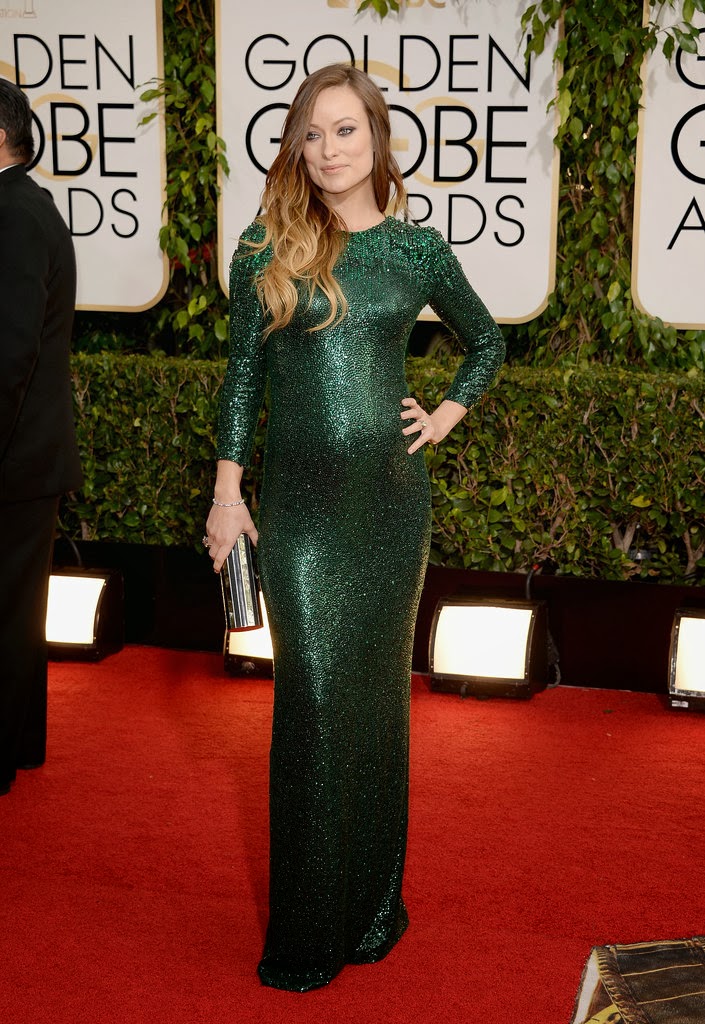
Olivia Wilde proved that pregnancy really does make you sparkle in this beautiful emerald gown at the GG's. The tight fitting ensemble really showed off her growing baby bump and she looked fantastic!


Red was also a major statement amongst the gorgeous celebs that graced the carpet! Here are a few of my fave's.

                                    Lupita Nyong'o looked the part in this Ralph Lauren gown.


Emma Watson wowed the paps with this AMAZING outfit! Will we perhaps be seeing more of this unusual ensemble throughout the coming year? If it looks this good on everyone else... then I sure hope so.


Amy Adams also dazzled onlookers with this simple colour blocked Valentino dress.


Do you agree or disagree with my chosen best dressed celebs? 

Lots of love as always, Kenzie xxx


Monday 13 January 2014

Golden Globes 2014: Worst Dressed

Sigh. Much like every year, award season brings the absolute crème de la crèmes of the fashion world and alternatively just the downright ugly. 

This years Golden Globe Awards is living proof that even our fave celebs can fail to hit the fashion mark, making the red carpet a more...um...intriguing place.

It seemed that Paula Patton and her hubbie, Robin Thicke may have had blurred lines about her elaborate choice of outfit for this years awards.


The actress opted for a Stephane Rolland Couture dress which can only be described as a giant meringue making it's way down the red carpet... Definitely unsavoury Paula.

I'm still baffled that the cast of Breaking Bad were able to fit on stage with those epic ruffles! 

So, let this disaster be a lesson to you, if your outfit is easily mistaken for a dessert or a Kleenex tissue, then you've probably missed the mark. Really missed it.

The 38 year old's flamboyant embellishment had her at the centre of attention throughout the event, with critics slamming her choice of clothing as 'hideous,' and I'm sorry to say Paula but I have to agree.

Also making headlines for her interesting style selection, is (I hate to say it,) Jennifer Lawrence. Much unlike her absolutely knock out dress that she wore to last years GG's, this unusual gown really doesn't do anything for the beautiful 23 year old.


But as always Jen stole our hearts with her acceptance speech after winning Best Supporting Actress and her crazy photo bombing antics... Can that women do no wrong?! Well minus the strange wedding dress thing with what looked like duct tape around it.


So because you did us all proud last night, we'll let you off this time Jen.

Do you love or hate these looks?

Lots of love, Kenzie xxx

Sunday 12 January 2014

What to Wear to a Concert

Last night I was preparing to unleash my inner rock chick as I headed to London to watch one of my all time favourite bands, Maroon 5. *Squeals with excitement*

Deciding what to wear to a concert can be a complicated task, because it is never one look fits all when going to a gig. It really depends on the genre of the concert it is that you are seeing. (Maroon 5 are a pop rock band!)

Being surrounded by thousands of exhilarated, dancing fans is certainly enough to send your temperature soaring. So I tend to go for shorts or a skirt to avoid the potentiality of becoming that one person who always seems to faint at gigs.

I teamed these black high waisted shorts with this white cropped top from Topshop. Just to add a little bit of a rock edge I completed this look with a red checkered shirt. I accessorised with some gold bangles and a cross ring.


As well as this, an over the shoulder bag is always a must when going to a concert. You can keep all of your things with you without fear of losing them or accidentally putting them down. Plus you have nothing to carry, so you can boogie to your hearts content and show off those moves like Jagger!

Unfortunately, all that I am wearing in this picture are clothes that are no longer in stock! So, I have put together a similar outfit just for you that would be perfect for any rock gig!


This embroidered bralet from Topshop, screams rock chick! (£32.00) Click HERE to view.


These black lazercut shorts from Topshop are practical and super cute. (£40.00) Click HERE to view.


Finish your look with this red chiffon shirt from New Look. (£19.99) Click HERE to view.

Lots of love, Kenzie xxx


Friday 10 January 2014

NOTD OPI Over The Taupe

Sometimes, it is easy to get into the habit of having the same coloured nails time and time again. You avoid the ever so strenuous task of selecting a new colour and bypass the possibility that you may not actually like the shade you have chosen after what feels like hours of trying to perfect them. Maybe I'm exaggerating a little... but you know what I mean!

So, to avoid the likelihood of this happening again in the future, today's NOTD (Nails Of The Day) are a little random! I thought I would play around with some colours to make an unusual combination for a fun and quirky look to try and inspire you to do the same. Never be afraid to try new things!

I used the OPI Over The Taupe polish which is a stunning mushroom colour. I opted for this because it is not a colour I would choose to wear in warmer weather, so I thought that I would experiment with this whilst we are still in the midst of winter.


Click HERE to view this product.

Just to add a little spice to my nails, I used a Sinful polish called Porn Star, on my ring fingers. This is a super cute purple glitter varnish which really gave my nails some character and a cute edge.


So, next time you go to paint your nails, don't be predictable, have some fun!

Lots of love, Kenzie xxx

Thursday 9 January 2014

MAC Pro Longwear Foundation

Finding a foundation that suites you can be tricky business, especially when there are so many to choose from. I recently tried the MAC Pro Longwear Foundation and I can really see why it has been so popular.


Click HERE to view this product. (£25.00)

It is often a laborious task finding your perfect colour match, but one that is most definitely worth investing your time in. Fortunately, all of my encounters with MAC have been so easy thanks to their lovely staff. Pop into your nearest MAC counter and simply explain that you are looking for a new foundation and they will be very quick to sit you down and find the absolute best match for you. Click HERE to locate your nearest store.

I have a yellow tone to my skin and find it very difficult to find a match for my natural colouring, however MAC seems to cater for all skin types! Their colour system is divided into two tones, NC and NW. NC products are for people with yellow undertones, like myself, and the NW products are for people with slightly pinky undertones. So if you have a warmer tone, then I suggest you going for the NC shades. (I use the NC42)

Despite having a medium coverage, the foundation still hid blemishes extremely well whilst keeping a very natural looking face. As well as this, it didn't feel heavy on the skin due to its lightweight creamy texture.

The foundation works by controlling the oil levels in the skin to ensure that a flawless look is maintained for longer which seems extremely accurate as I really didn't notice any obvious shine until the end of the day.


I definitely recommend you trying this gorgeous foundation. Its long lasting capabilities promises to provide up to 15 hours of wear, a major bonus if you are constantly on the go! 

Lots of love, Kenzie xxx   

Wednesday 8 January 2014

How to Bake a Victoria Sponge

It's apparent from my blog that I love chatting about all things fashion and beauty, from the latest trends to my favourite make up products. However, it wasn't until I actually researched the definition of beauty that I realised why limit myself to just make up?

According to the Oxford dictionary, beauty can be defined as, 'a combination of qualities, such as shape, colour, or form, that pleases the aesthetic senses, especially sight.' 

So I thought, you know what, I'm going to blog about my cakes too! I love baking and half of the fun is making the cake look beautiful after you've cooked it.

Here's my recipe to my Victoria Sponge! (Be warned...it's masssssive!)


Ingredients:
12oz butter/margerine
12oz caster sugar
6 eggs 
12oz self raising flour

Method:
1. Preheat the oven to 180C/Gas 4
2. Cream together the butter and the sugar in a large mixing bowl. You can use either a wooden spoon or an electric whisk to do this. Beat in the eggs one at a time.
3. Sieve in the flour and mix briefly.
4. Grease your cake tins and distribute the mixture evenly between them both.
5. Bake in the oven for about 25 minutes.
6. Leave to cool and finish by filling with strawberry jam, cream and sliced strawberries. Dust the service with icing sugar and enjoy!


Yummy!!

Lots of love, Kenzie xxx


Tuesday 7 January 2014

Estée Lauder Pink Parfait Long Lasting Lipstick

All beauty lovers like to be versatile in the products that they use when applying their make up, whether that be experimenting with new ones or just alternating old favourites. However, we all have those go to items that we use on a regular basis because they are just so fabulous.

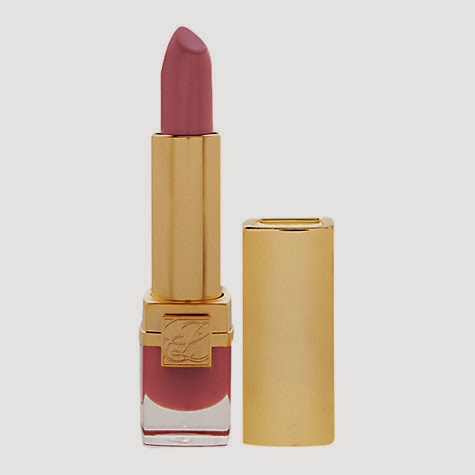
For me, the Estée Lauder Pink Parfait Long Lasting Lipstick looks effortlessly beautiful with any look. I tend to apply this particular colour with a lip brush because it creates a stunning frosted pink, which can turn somewhat heavier if applied too generously so the brush just helps to blend it out a little bit. This strong coverage means that it would be suitable for anyone with pigmented lips!


Click HERE to view this product. (£20.00)


The shimmer incorporated within this gorgeous lipstick gives it a gloss feel and lasts for hours without drying out. I usually reapply it after about four hours just to keep my lips looking exceptionally full however the colour lasts for much longer than this.

Much like the product itself, the packaging is elegant and sophisticated making it the perfect handbag accessory.

Lots of love, Kenzie xxx

Monday 6 January 2014

Suddenly Madame Glamour by Lidl

Coco Chanel once said, 'A woman who doesn't wear perfume has no future...' But trying to keep up with a powerhouse company like Chanel and their undeniably sweet smelling fragrances can get a little expensive at the best of times. (Especially if you are like myself and get extremely spritzer happy when applying your fragrances.)

Now, don't get me wrong, I think that it is absolutely acceptable to treat yourself from time to time and indulge in some pricier products but what about your everyday scent? Can we really justify spending a small fortune every month on a tiny bottle of perfume?

Chanel Coco Mademoiselle, comes in at £67 a bottle for 50ml. OUCH! However, global supermarket chain Lidl decided to compete with this prestigious brand by producing a rival fragrance called Suddenly Madame Glamour. A pretty brave move if you ask me, but one that definitely seems to be worth while.


Costing an absolutely amazing £3.99, this dupe smells almost identical to that of its competitor. It's at this point that I wish smellovision was real, but sadly that is just not the case. So instead, take my word for it lovely readers, its citrus and floral notes are immensely pleasant and undeniably worth its modest price.  

So if you like to keep reapplying your perfume throughout the day, then it may well be worth you popping down to your local Lidl store and purchasing this beautiful, feminine fragrance. And even if Suddenly Madame Glamour isn't the scent for you, then it's only cost you £3.99 right? The only down side? No Keira Knightley!

Let me know what you think of this lovely floral fragrance.

Lots of love, Kenzie xxx


Sunday 5 January 2014

5 Easy Steps To Using An Eyelash Curler

Using an eyelash curler is, for many, a very daunting prospect. If you are finding yourself nodding and agreeing with me, then you are not dissimilar to myself a couple of months ago. But don't let this unfamiliar piece of equipment intimidate you, it truly can instantly enhance the shape of your eyes.

I naturally have a slight curl to my lashes, but I am still able to see the effects after using an eyelash curler! However, if you have straighter lashes then this will most definitely have a huge impact on you.


MAC Cosmetics Full Lash Curler (£16.00) is amazing, it is very gentle on the lashes but still achieves a beautiful, soft curl! Click HERE to view this product.


All you have to do is follow these five easy steps to achieve beautifully curled lashes.

1. It's important that you begin curling your lashes BEFORE you have applied any mascara. Many people do it differently and apply one coat and then use the curler, however I find that it can be more damaging to the lashes when using it with mascara as well as being more painful because the curler tends to stick to the lashes. 

2. Tilt your head upwards so that you are looking down into the mirror, this makes your lashes angular. This will make it much easier to curl them and will have a much greater outcome because if you are looking directly at a mirror your lashes are touching the crease of your eye, making it difficult to access them properly.

3. After making sure your curler is clean, place it onto your cheek and position it at the base of your lashes, making sure that you have gathered all of your eyelashes into the curler. (But be very careful not to pinch your lid!)

4. Once you are sure that you have positioned the curler correctly, squeeze down on the handle slowly until your eyelashes are between the two pads and hold it down. Pump the eyelash curler gently for ten seconds. 

5. Finish by applying your favourite mascara from the bases of your lashes right through to the tip! 

And there you have it, it really is a piece of cake! So next time you come across this funny looking device, go for it!

Lots of love, Kenzie xxx

Saturday 4 January 2014

Barry M Matte Caramel Nails

So the saying 'start as you mean to go on' has been thrown around a lot the past couple of days, but how true is it?! 

For me the way you look after yourself can have a huge impact on the way that you feel! So why not take out a few more moments each day to pamper yourself. Whether it be to make sure your nails are in beautiful condition or just to have some 'you time.'

Today, I tried out some new Barry M nail varnishes! I used the matte caramel shade which gives a really lovely wintery feel and I added to this by involving a feature nail by using the glitter yellow topaz nail varnish. This glitter polish is new to the Barry M family and I love it. Its extremely easy to apply and unlike most glitter nail polish's, it only required two coats.


I chose the caramel colour because I often opt for bright colours in my outfits and find that sometimes my nails can clash with what I'm wearing! So this neutral varnish goes well with anything.

As you can see from the pictures below, I went for a very bright midi dress with gold accessories, so my neutral nails and the hint of gold on the feature nail matched perfectly! I did actually end up wearing different shoes to those that I am wearing in the pictures below, I wore leopard print platforms which were MUCH more uncomfortable but looked so much better with the dress!


(£3.99) Click HERE to view this product. 


(£2.99) Click HERE to view this product.


I 100% recommend you trying these amazing products, they are super cute!

Lots of love, Kenzie xxx

Friday 3 January 2014

Contouring & Highlighting for Beginners. (Stage 2)

Following on from yesterday's blog, all about highlighting, today I'll be discussing contouring the face with bronzer and the use of blush. 

When contouring your cheeks it is important to make sure that you are doing so in the right area. If bronzer is applied in the wrong way, it can look very unnatural and completely opposite to the subtle shadow like impression that we are trying to make. 

To ensure that you are contouring the correct area, line your brush up with the top of your ear and the corner of your mouth, just underneath your cheekbone. This will give an extremely flattering finish.

Start by contouring your cheeks! Beginning at the top of your ear, apply the bronzer with a brush in circular motions in the direction of the corner of your mouth. However, do not take the bronzer any further than in line with the centre of your eye. Once again this will become unnatural and not so effortless!

Ensure that the bronzing powder has been worked into the hair line. You don't want any sudden make up lines to ruin your gorgeous make up! Simply achieve this by removing the excess from the brush and working it into the skin in circular motions.

When contouring your whole face, remember the three rule. You are aiming to apply bronzer from your hairline, into your cheekbones and finishing underneath your jawline. (In the shape of a three!) 

When doing this you only need a very small amount of product on the brush because if it is too dark they will no longer look like shadows being casted on the face.

Hoola by Benefit is fabulous because it is extremely natural and unlike most bronzers does not contain sparkles. Although this does like nice occasionally for a night out, when trying to achieve a natural look it is best to use a matte product. Click HERE to view this item. (£23.50)


To finish your perfectly defined face, add a small amount of blush to the apples of your cheeks.

I really hope that you have found both stages of my contouring blogs beneficial!

Lots of love, Kenzie xxx 

Thursday 2 January 2014

Contouring & Highlighting for Beginners. (Stage 1)

Contouring the face can make a huge difference to your appearance. This method adds different dimensions to the face and can accentuate your best features. 

Contouring involves three main stages, highlighting, contouring and blush. However, in an attempt to keep the information overload to a minimum I thought I would blog about these stages separately.

This blog post is all about highlighting!

Highlighting can help to bring attention to a particular area on the face and can help to achieve more pronounced features, such as your cheekbones. You should aim to target areas that the light naturally hits. 

There are five main places that people tend to highlight on the face.
1. Below the eyes. This makes them 'pop' and works beautifully with a dramatic or smokey look. This can also help to eliminate dark circles underneath the eyes. If this is something that you particularly struggle with then I recommend using a salmon colour highlighter because that is particularly effective at cancelling out bags. 
2. Below the brow line and centre of the forehead.
3. Above the Cupid's bow. This accentuates the lips and enhances their shape. This effect can also be enhanced further by adding gloss to the centre of the lips to make them appear significantly fuller.
4. The highest point of your cheekbones.
5. The nose. This is a really useful method when trying to create the illusion of having a slimmer nose.

Highlighters come in both powder and liquid form. I tend to use both, depending on the look I am aiming to achieve. However, I would recommend using a liquid highlighter for a night out because they last for a longer period of time in comparison to the powder which seems to sink in to the skin more.

When applying the liquid, pat the product in to the skin rather than rubbing it in as this can remove the foundation from the skin.

The high beam highlighter by Benefit is amazing. (£19.50) Click HERE to view this product.


Contouring is also a hugely popular technique amongst celebs! Take Kim Kardashian for example, her beautifully sculpted face has been cleverly contoured to magnify her facial features. I have chosen this picture below because I think it demonstrates perfectly which areas of the face require highlighting.


Just remember, as with everything, practice makes perfect! So it may take you a couple of attempts to really get to grips with where on your face needs highlighting but keep at it and you'll get there!

Let me know how you get on with it! Lots of love, Kenzie xxx

Wednesday 1 January 2014

KIKO Make Up Milano

To all of my lovely readers,

I'll begin by wishing you the happiest New Year, good luck in all that you do in 2014 and may all of your dreams come true.

To kick start January, I thought I'd share with you my latest make up discovery. 

Whilst shopping on holiday last month, I came across the most amazing make up shop called KIKO!


I had heard little things here and there about the store but had never actually ventured into one myself.

Their array of glamorous eyeshadows were what initially captured my attention but they also boast a huge selection of stunning nail polishes and an outstanding skincare range. Here's a little glimpse of what the store looks like!


As you can imagine, I certainly didn't come home empty handed, however I will post individual blogs about the items that I purchased to give a more detailed over view of the products.

So for now, I am simply urging you to check out their website and see if anything takes your fancy! It's also exceptionally appealing considering there is a sale of up to 50% off on selected products for a short time. So what are you waiting for? Click HERE to view KIKO's website.

Alternatively, if you are visiting the capital, pop into one of the three stores that KIKO have in London.

I hope you love their products as much as I do. Please feel free to comment and follow! 

Lots of love, Kenzie xxx